Arduino – Analog Joystick Module and Controlling Servo Motor


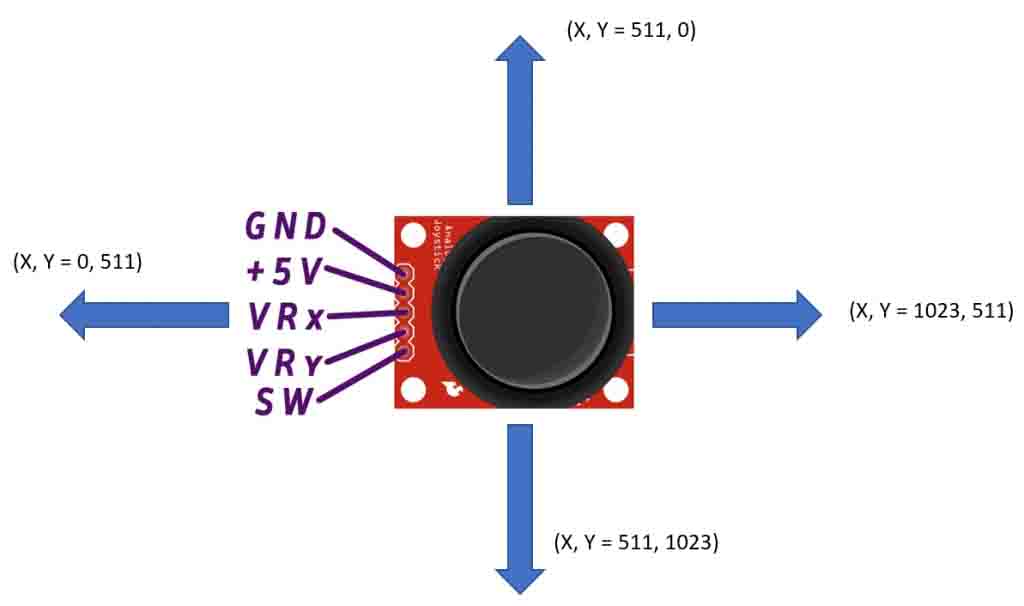
This is a very simple module which is constructed with two potentiometer placed in 90 degree to each other. When the joystick is in center/resting position, has output of 2.5v. At the extreme positions the output voltage is 5v. So moving the stick in different directions will output different voltage values.
As we know that the analog pin on arduino operates in value ranging from 0 to 1023. so when the joystick is in the rest position it will produce a value of 512, we can expect small variations due to spring mechanism.
As told before this has two potentiometer, one for each axis. This is a biaxial joystick.
Its operating voltage is 5v. It also has a pushbutton.
Pin Configuration
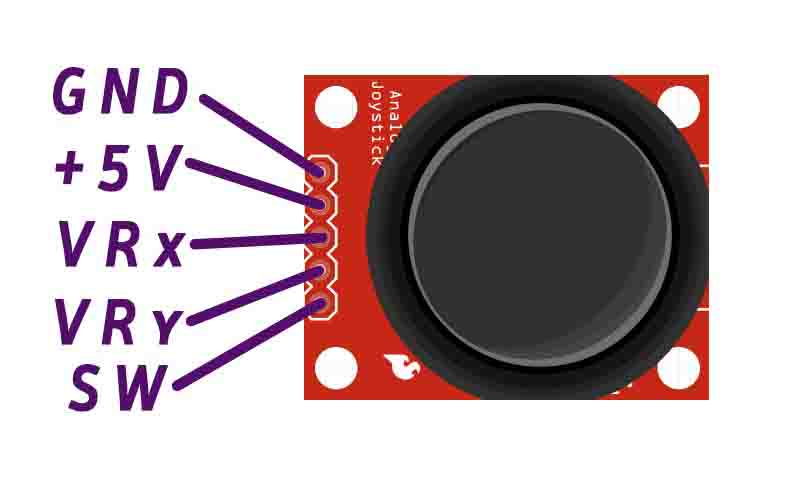
| Module Pin | Description |
| GND | Ground/Negative terminal/pin |
| +5v | 5 volts input voltage |
| VRx | Voltage from x-axis potentiometer |
| VRy | Voltage from y-axis Potentiometer |
| SW | Switch |
Analog value on each axis
Materials Required
- Arduino UNO Board
- Joystick HW-504 or KY-023
- Jumper cables
- USB A/B cable for connecting arduino to computer
Circuit Diagram
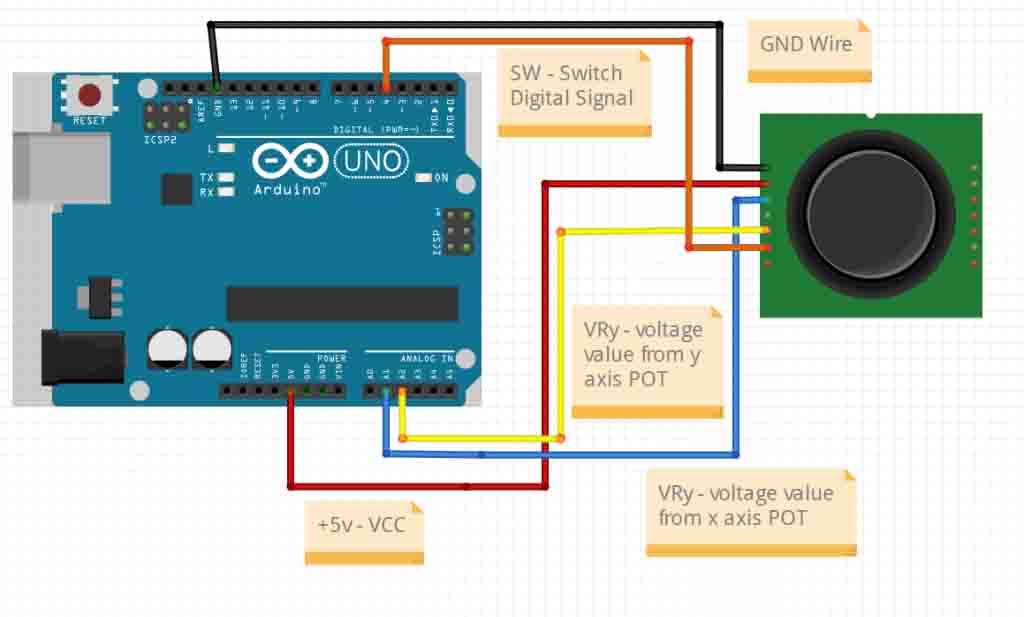
The connection of the joystick is very simple as we just have to connect VRx and VRy to ADC pins of microcontroller and the switch pin to digital pin of microcontroller.
Arduino Sketch
/* This code is to read the analog values from the jopystick */
/* www.tastytechharbour.com */

int axis_xpin = A1; // The output pins from the joystick is always analog and also its a voltage output.
int axis_ypin = A2; // This can only be measured from the analog pins on the Arduino UNO board. There are 6 analog pins on
int pushbutton = 4; // Arduino pin you can configure any of the analog pins.
                    // Push button is connected to digital pin because its output is high or low hence we read it from the
                    // digital pins.

void setup() {
  // put your setup code here, to run once:
  pinMode(pushbutton,INPUT_PULLUP);
  Serial.begin(9600);

}

void loop() {
  // put your main code here, to run repeatedly:
  int axis_x_val = analogRead(axis_xpin);
  int axis_y_val = analogRead(axis_ypin);
  int buttonPressed = digitalRead(pushbutton);

  Serial.print("Y axis/Vertical movement of stick values are :");
  Serial.print(axis_y_val);
  Serial.print("   X axis/horizontal movement of stick values are :" );
  Serial.print(axis_x_val);
  Serial.print("   Button Pressed :");
  Serial.println(!buttonPressed);
}
Application
- Gimbal Control for Camera
- Gamepad
- Analog input to machines
- Robot control – Example: Car, Robot arm etc.
- Used in prototype projects
- DIY Project
Controlling the Servo motor using Joystick with Arduino
Check out the video below for more visual explanation,
Arduino Sketch
/* This code is to read the analog values from the joystick and using map function to control the Servo motor  */
/* www.tastytechharbour.com */

int axis_xpin = A1;
int axis_ypin = A2;
int servo_Left = 3;
int servo_Right = 5;

#include <Servo.h>

Servo Servo1;
Servo Servo2;


void setup(){
  Servo1.attach(servo_Left);
  Servo2.attach(servo_Right);
  Serial.begin(9600);

}

void loop(){
  int axis_x_val = analogRead(axis_xpin);
  int axis_y_val = analogRead(axis_ypin);
  int ServoPWN_x = map(axis_x_val,0 , 1023, 10,170);
  int ServoPWM_y = map(axis_y_val, 0 ,1023,10,170);
  Serial.print("Y axis/Vertical movement of stick values are :");
  Serial.print(axis_y_val);
  Serial.print("   X axis/horizontal movement of stick values are :" );
  Serial.print(axis_x_val);
  Servo1.write(ServoPWN_x);
  Servo2.write(ServoPWM_y);

}


