LCD 16X2 with Arduino – Tutorials
May 19, 2021

Check out the video for better understanding,
Components required
Arduino Uno (original) – Buy
Breadboard – Buy
LCD 16X2 without I2C module – Buy
LCD 16X2 with I2C module – Buy
Jumper Cables – Buy
USB A to B – Buy
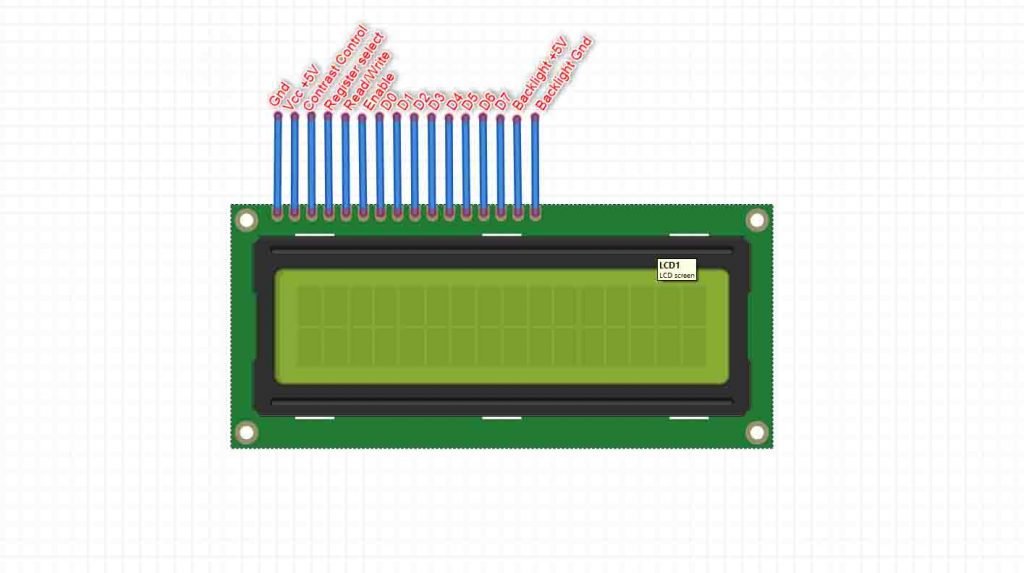
Pinout configuration
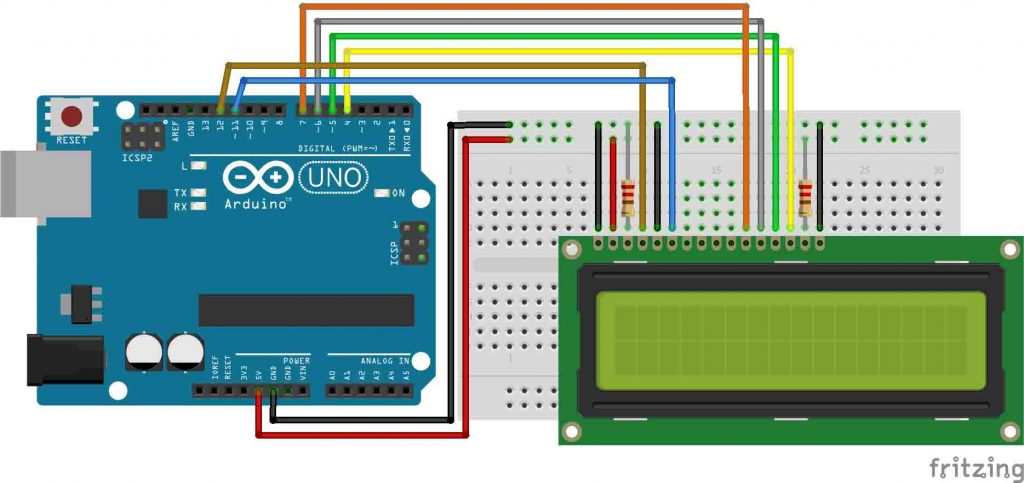
Circuit connection
Arduino Code for printing Text on LCD
Please refer to the comments next to the code for better understanding.
// Code by Tasty Tech Harbour
// Blog - www.tastytechharbour.com
// Personal website - www.srujancmutt.com
// Contact - contact@srujancmutt.com
// Youtube Channel - https://www.youtube.com/c/TastyTechHarbour/

// The below code is for serial communication with the Arduino.
// Links to the products used in this projects are mentioned in my blog.

#include <LiquidCrystal.h>               // Liguid crystal library from - Sketch menu --> include library --> LiquidCrystal

LiquidCrystal lcd(12, 11, 7, 6, 5, 4);   // We need to pass six parameter to lcd object mentioned below, (LiquidCrystal before LCD is the class)
                                         // (Register Select, Enable, D4, D5, D6, D7) These are he pins on the LCD Display
                                         // The values passed are nothing but the pin number (12, 11, 7, 6, 5, 4) on the arduino board.

void setup() {
                                         // put your setup code here, to run once:
  lcd.begin(16,2);                       // This begin function sets the display with number of rows and columns, (16,2) i.e (number of columns and 2 is number of rows)

}

void loop() {
                                         // put your main code here, to run repeatedly:
  lcd.setCursor(0, 0);                   // here you are setting the cursor for the first character to print, as (Column , row)
  lcd.print("TastyTechHarbour");         // We are using the print function to print on the LCD.
  delay(3000);                           // Delay function is used to give a wait time for the next line to execute, its usually in milliseconds
  lcd.clear();

  lcd.blink();
  delay(3000);
  lcd.noBlink();

  lcd.setCursor(6,0);
  lcd.print("LCD");
  delay(2000);
  lcd.setCursor(0, 1);                   // Now the cursor is set to second row first column
  lcd.print("Arduino Tutorials");
  delay(4000);
  lcd.clear();

}
Arduino Code for display character on LCD
Please refer to the comments next to the code for better understanding.
// Code by Tasty Tech Harbour
// Blog - www.tastytechharbour.com
// Personal website - www.srujancmutt.com
// Contact - contact@srujancmutt.com
// Youtube Channel - https://www.youtube.com/c/TastyTechHarbour/

// The below code is for serial communication with the Arduino.
// Links to the products used in this projects are mentioned in my blog.

#include <LiquidCrystal.h>               // Liguid crystal library from - Sketch menu --> include library --> LiquidCrystal

byte arrowRight[] = {                    // I got this generated from online LCD character generator, you can just do google search
  B01000,                                // Find the link for LCD cutom character generator : https://maxpromer.github.io/LCD-Character-Creator/
  B00100,
  B00010,
  B00001,
  B00001,
  B00010,
  B00100,
  B01000
};

byte arrowLeft[] = {
  B00010,
  B00100,
  B01000,
  B10000,
  B10000,
  B01000,
  B00100,
  B00010
};

LiquidCrystal lcd(12, 11, 7, 6, 5, 4);   // We need to pass six parameter to lcd object mentioned below, (LiquidCrystal before LCD is the class)
                                         // (Register Select, Enable, D4, D5, D6, D7) These are he pins on the LCD Display
                                         // The values passed are nothing but the pin number (12, 11, 7, 6, 5, 4) on the arduino board.

void setup() {
                                         // put your setup code here, to run once:
  lcd.begin(16,2);                       // This begin function sets the display with number of rows and columns, (16,2) i.e (number of columns and 2 is number of rows)
  lcd.createChar(0, arrowRight);
  lcd.createChar(1, arrowLeft);
}

void loop() {
                                         // put your main code here, to run repeatedly:
  lcd.setCursor(0, 0);                   // here you are setting the cursor for the first character to print, as (Column , row)
  lcd.print("TastyTechHarbour");         // We are using the print function to print on the LCD.
  delay(3000);                           // Delay function is used to give a wait time for the next line to execute, its usually in milliseconds

  for (int i=0; i<=15 ; i++) {
    lcd.setCursor(i,1);
    lcd.write((byte) 0);
    delay(300);
  }

  lcd.clear();

  lcd.blink();
  delay(3000);
  lcd.noBlink();

  for (int i=0 ;i<5; i++){
    lcd.setCursor(i,0);
    lcd.write((byte) 0);
    delay(500);
  }
  lcd.setCursor(4,0);
  lcd.print("Thank You");
  delay(2000);

  for (int i=13 ;i<=15; i++){
    lcd.setCursor(i,0);
    lcd.write((byte) 1);
    delay(500);
  }

  delay(2000);
  lcd.setCursor(2, 1);                   // Now the cursor is set to second row first column
  lcd.print("For Watching");
  delay(4000);
  lcd.clear();
  delay(500);

}


