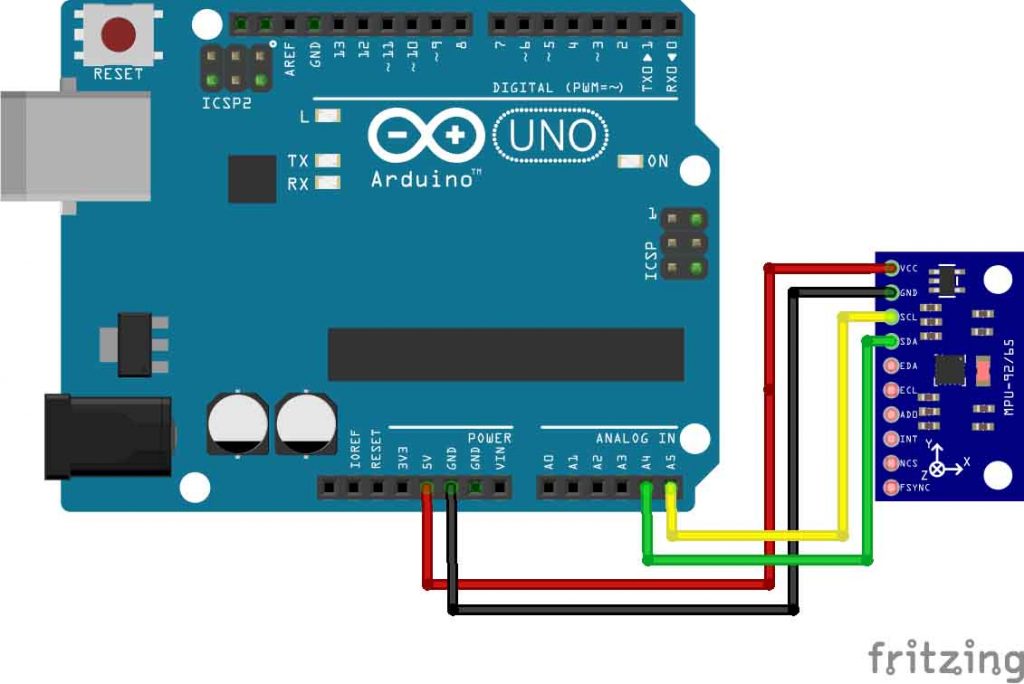
Power Supply of 5v from Arduino if the modules has 3.3v regulator
2
GND
Ground
3
SCL
I2C Serial Clock signal or SCLK for SPI Communication
4
SDA
I2C Serial data signal or Master output slave input pin for SPI communication
5
EDA
I2C Serial Data pin for external sensor
6
ECL
I2C Serial Clock pin for external sensor
7
ADO
I2C address change or Master input slave out for SPI Communication
8
INT
Interrupt pin
9
NCS
Chip Select pin
10
FSYNC
Frame synchronization
Check out the code below
// Code by Tasty Tech Harbour
// Blog - www.tastytechharbour.com
// Personal website - www.srujancmutt.com
// Contact - contact@srujancmutt.com
// Youtube Channel - https://www.youtube.com/c/TastyTechHarbour/

// The below code is for I2C communication with the Arduino.
// Links to the products used in this projects are mentioned in my blog.

#include <MPU9250.h>
#include <Wire.h>

MPU9250 IMU (Wire , 0x68);      // MPU9250 is a class and "IMU" is a object, we need to pass parameter to the object "IMU". wire is used for I2C communication,
                                // second parameter is for I2C address, we left the ADO pin unconnected so its set to low, 0x68 is address,
                                // if it was high then the address is 0x69

void setup() {                  // put your setup code here, to run once:
  Serial.begin(9600);           // initialize the serial monitor
  IMU.begin();                  // Initialize the IMU object
}

void loop() {
                                // put your main code here, to run repeatedly:
  IMU.readSensor();
  //Accelerometer data code
  Serial.print("Accelerometer X axis: ");
  Serial.print(IMU.getAccelX_mss(), 3);     // to get the accelerometer value from the data buffer in the X direction, these values are in meter per second square
  Serial.print("               Accelerometer Y axis: ");
  Serial.print(IMU.getAccelY_mss(), 3);
  Serial.print("               Accelerometer Z axis: ");
  Serial.println(IMU.getAccelZ_mss(), 3);
  //Gyroscope data code
  Serial.print("Gyroscope X axis(radians): ");
  Serial.print(IMU.getGyroX_rads(), 3);        // gets the gyroscope value from the data buffer in the X direction, these vavlues are in radians per second
  Serial.print("           Gyroscope Y axis(radians): ");
  Serial.print(IMU.getGyroY_rads(), 3);
  Serial.print("           Gyroscope Z axis(radians): ");
  Serial.println(IMU.getGyroZ_rads(), 3);
  //Magnetometer data code
  Serial.print("Magnetometer X axis(MicroTesla): ");
  Serial.print(IMU.getMagX_uT(), 3);                //gets the magnetometer value from the data buffer in the X direction, these are in microtesla
  Serial.print("    Magnetometer Y axis(MicroTesla): ");
  Serial.print(IMU.getMagY_uT(), 3);
  Serial.print("    Magnetometer Z axis(MicroTesla): ");
  Serial.println(IMU.getMagZ_uT(), 3);
  //Temperature reading
  Serial.print("Temperature: ");
  Serial.println(IMU.getTemperature_C(), 2);         // gets the temperature value from the data buffer and returns it in units of C
  Serial.print("*********** Next buffer data *****************");
  Serial.println("    ");
  Serial.println("    ");
  Serial.println("    ");
  Serial.println("    ");
  delay(2000);


}


Thanks for your blog, nice to read. Do not stop.
Hi Srujan,
Thank you for the example code. Can I ask you which MPU9250 library are you using in this example?
Thanks.